
Before..

After...

How did I do it with Photoshop?
- On the right panel, find and click CHANNELS.
Ctrl+click RGB layer

- It made a selection of the lighter areas.
We want shadows, so we invert the selection:
Pick Magic Wand tool, right-click image, pick Select Inverse.
-
Let us paste our selection as a new Layer:
Go back to LAYERS, press Ctrl+J
-
Now we lighten the shadows:
Right-click the new layer, pick Blending Options, and set the Blend Mode to Screen.


Thats it, we are done with the core of the problem!
Now theres a few tweaks to do.

We may want to apply the lightening only on part of the image or not so strong. Layer Mask will take care of that. At the bottom of the LAYERS panel, click
 to Add Layer Mask. A white layer will appear locked to your shadows-lightening layer.
You can draw on the mask or erase from it as you like. White means the effect is applied in full, black means it is not applied at all. So erase where you do not want lightening, draw where you want it, and you can even draw with lower Flow where you want partial lightening. I omitted much of the greenery as it looked weird without shadows.
Another thing I noticed is, when you lighten the shadows a lot, they become more color saturated than the rest. This can be fixed with Adjustement layer. in LAYERS window, right beside Add Layer Mask, right-click
 to add Adjustment Layer. Pick Hue/Saturation, and in the ADJUSTMENTS panel lower the Saturation. Of course, it gets applied to all layers. To apply it only to the last layer, click this icon
  at the bottom of ADJUSTMENTS panel.
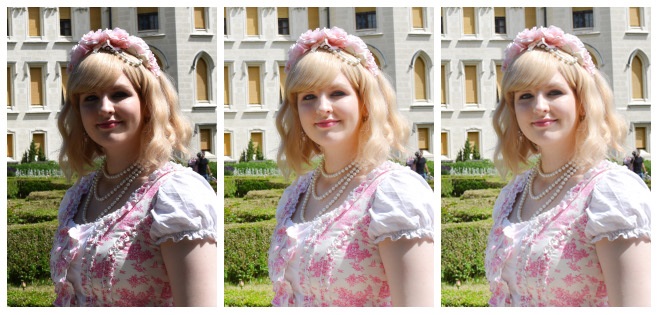
We are all set now! You can also lighten the shadows repeatedly, but removing the shadows completely will feel unnatural! Here is a closeup of an original image, two passes of shadows lightening, and the difference when Saturation adjustment layer was used. It looks much more natural after!
I was so glad I could save the meetup photos!
I hope it will come handly to more people ^.^
I learned something new, thank you!
ReplyDelete